The right way to nginx in Synology NAS

If you are familiar with the reverse proxy feature in Synology DSM, then you are probably using it to expose your Docker and native applications to the outer world.
A typical way this is done is as follows:
- Allowing ports 80 and 443 to your network and forward the traffic to your NAS.
- Assuming that you are owning a domain, you add a new subdomain pointing to the public address of the network your NAS resides in. Let's say the subdomain is: app.yourdomain.com.
- You create a reverse proxy entry in DSM forwarding traffic with the host app.yourdomain.com to the correct localhost:port combination so it hits the correct application.
- Create a subdomain wildcard certificate using Let's Encrypt and apply that to your reverse proxies. This enables you to run your services in HTTPS with a validated certificate.
The problem
The reverse proxy is powered by the nginx instance running in DSM. As you can see, with just a few steps we were able to use it to expose our application. So, what is the problem with it? Well, there are a couple of problems. The main one is that there is no easy way to automate wildcard certificate renewal! By using the built-in nginx, our only solution to add wildcard certifications is by using the GUI. I already have a way to automatically create a new set of certificates using Let's Encrypt (a post will follow about this). But to actually have the certificate applied, I have to manually import the new certificate every third month before it expires. This quickly becomes very annoying. I have found scripts claiming to solve this issue by overriding certificate files and nginx configs deep inside the system folders, but each time, it did more harm than good. It's never a good idea to mess with the system configuration files of DSM. So, in this post, I will show an alternative way to set up nginx, a way that enables you to auto-renew your certificates.
And worth mentioning, the built-in nginx also has the following limitations:
- Any changes in the config will be overridden by the system any time the nginx service is restarted.
- You cannot use streams in your config - needed in case you want to handle other protocols than HTTP.
What's the solution?
Having a shiny built-in native nginx is great, it is so great that many of us won't bother looking for another installation. But, installing a new instance will actually overcome all of our issues. The tradeoffs are that we won't have a GUI for setting reverse proxy rules, but it's totally worth it. I will show the steps to install nginx, configure a reverse proxy and import a new certificate.
Install nginx with docker-compose
The easiest way to install another nginx is by Docker. I prefer using docker-compose, and here is the yaml snippet for it below.
version: "3"
services:
  nginx:
    container_name: nginx
    restart: always
    image: nginx:latest
    ports:
      - "5080:80"
      - "5443:443"
    volumes:
      - /mount/path/nginx/nginx.conf:/etc/nginx/nginx.conf
      - /mount/path/nginx/letsencrypt:/etc/letsencrypt
What stands out in this snippet are the ports. DSM does not allow your docker image to bind to 80/443 in the host machine, as it is allocated by the system. So instead, we use 5080 and 5443, the port numbers don't matter, you may choose other available ports. We also need to mount the configuration file and the letsencrypt folder. To start this docker image, save the snippet in a file called docker-compose.yaml and run docker-compose up -d nginx. You should now be able to see the default web page by going to http://local-nas-ip:5080.
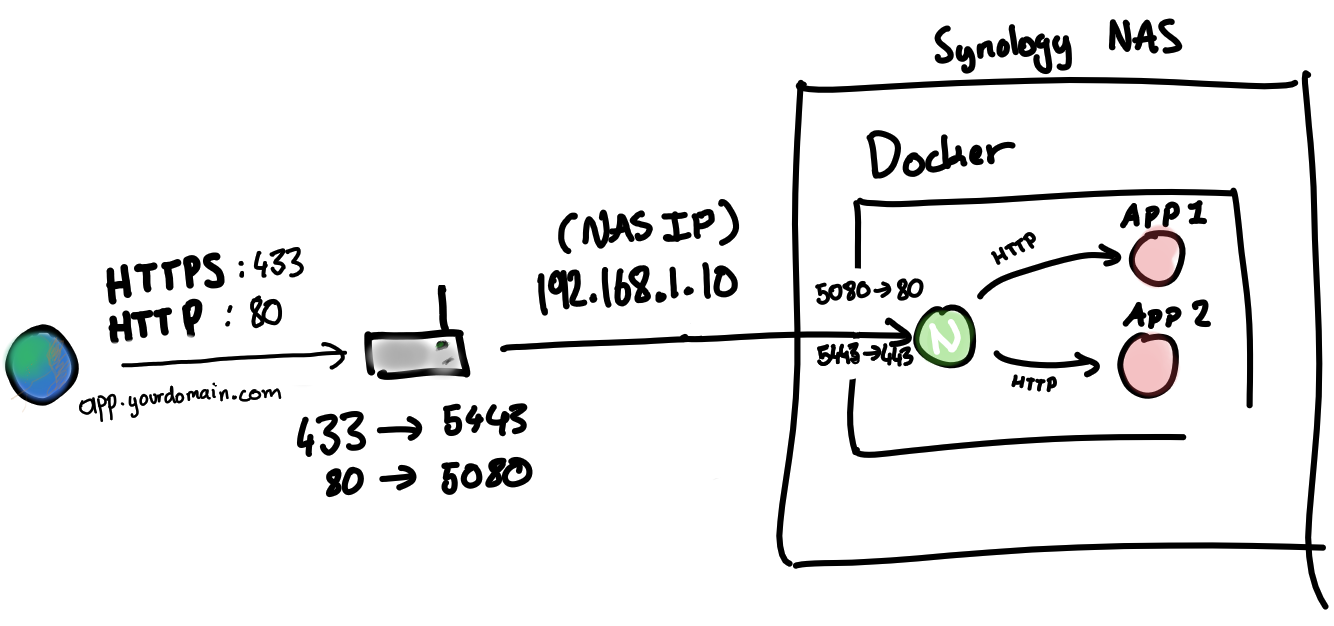
So, how do we expose these weird ports to the outer world? The idea is to let the router convert incoming 80/443 traffic to 5080/5443 and send it to Synology NAS. It will be converted back from these ports to 80/443 by Docker just before reaching nginx.
While I am at it, I might just show you the full networking diagram. Take at a look the drawing below, it gives a clear picture of what we are trying to achieve.

Configure a reverse proxy
Now before we do this, we need the following prerequisites in place:
- You have an application running with the container name "app".
- You have the subdomain app.yourdomain.com pointed to your public IP address.
- Your router is configured as shown in the network diagram above
- You have created the mount folders.
For you to be able to actually reach your docker app by using the subdomain, you need to configure nginx.conf file. Here is a snippet that shows you how to do that:
user  nginx;
worker_processes  auto;

error_log  /var/log/nginx/error.log notice;
pid        /var/run/nginx.pid;


events {
        worker_connections  1024;
}


http {
        include   mime.types;
        gzip              on;
        gzip_http_version 1.0;
        gzip_proxied      any;
        gzip_min_length   500;
        gzip_disable      "MSIE [1-6]\.";
        gzip_types        text/plain text/xml text/css
                text/comma-separated-values
                text/javascript
                application/x-javascript
                application/atom+xml;


        server {
                listen 443 ssl;
                server_name app.yourdomain.com;
                ssl_certificate     /etc/letsencrypt/fullchain.pem;
                ssl_certificate_key /etc/letsencrypt/privkey.pem;
                location / {
                        proxy_pass http://app:80;
                        proxy_redirect     off;
                        proxy_set_header   Host $host;
                        proxy_set_header   X-Real-IP $remote_addr;
                        proxy_set_header   X-Forwarded-For $proxy_add_x_forwarded_for;
                        proxy_set_header   X-Forwarded-Host $server_name;
                }
        }
You can see that we are exposing our application with SSL and referring to the folder where the certificates will be located. You can use acme.sh to automatically create and copy the files over to the certificates folder.
Now, you should be able to reach your application by going to https:app.yourdomain.com!
